Deploying Pleroma in tinfoil hat mode
So you want to deploy pleroma, or already run it, and you either expect to be attacked or are already under attack. Your one VPS isn't holding up to the strain, and you want to keep your space open for those that need it.
The purpose of this post is to guide you through setting up a more secure instance that won't get knocked offline so quickly.
You will need:
- 3 ideally network-seperated hosts
- 1*highish-spec server to run pleroma itself. size based on expected # of users
- 2*very low spec, you can go for AWS t3 micro or similar
- an ssh terminal
- some patience
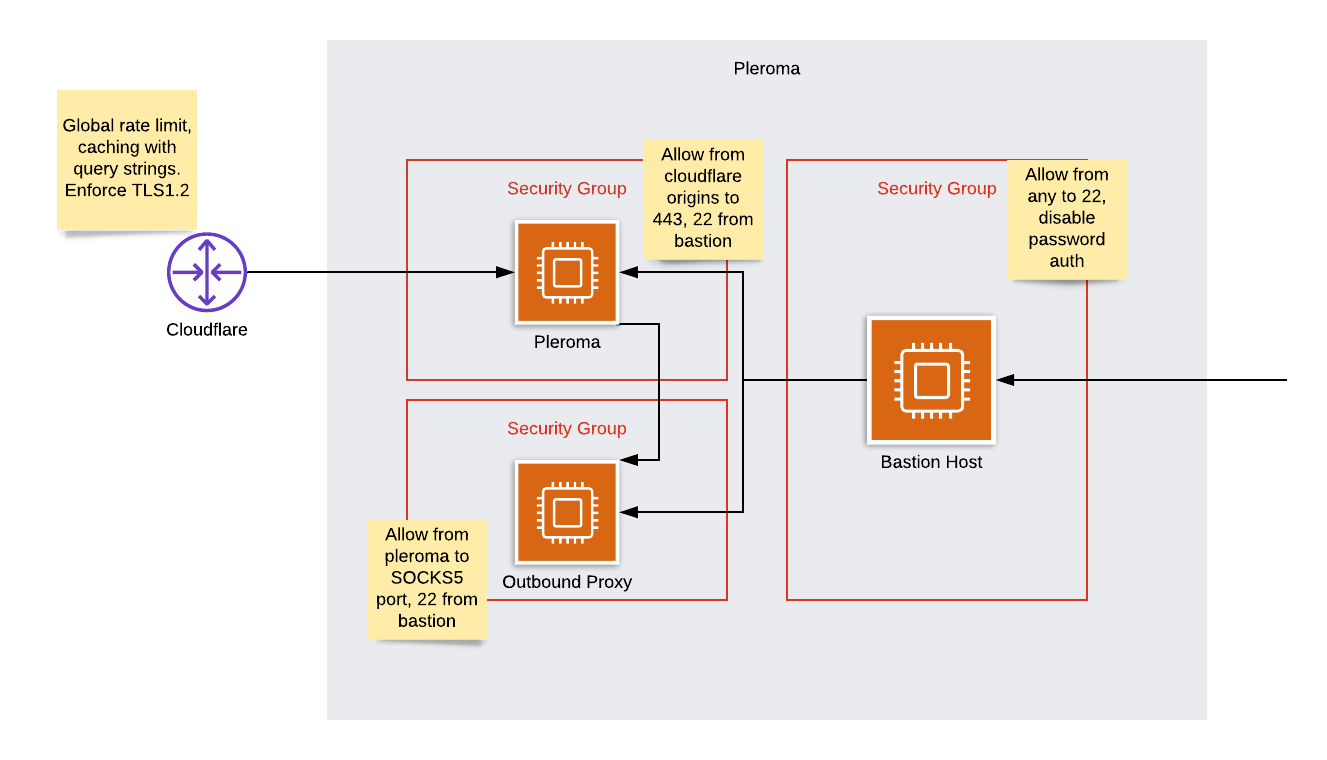
The architecture we're aiming for is this:
I will assume you're using ubuntu throughout. If you use another distribution, you can follow the gist, but just alter commands when needed.
Setting up the bastion
First thing's first, you'll want a bastion. Spin up a small host somewhere, don't point any DNS at it or anything.
First, we want to shut off all ports except 22.
sudo apt-get install ufw
sudo ufw default deny incoming
sudo ufw allow 22
sudo ufw enable
It'll shout at you about disrupting connections, but we only care about 22 so it's ok.
Now we want to turn off password authentication - otherwise you'll have
people everywhere trying to brute-force you. Make yourself an ssh key if
you don't already have one with ssh-keygen on your local host, and paste
the contents of ~/.ssh/id_rsa.pub into your bastion host's /home/myuser/.ssh/authorized_keys
file.
Try logging into your bastion with the ssh key - it shouldn't ask you for a password.
Now we've got that sorted, we can stop anyone ever logging in with a passwor again.
sudo nano /etc/ssh/sshd_config
make sure PubkeyAuthentication is set to yes, and PasswordAuthentication to no,
then run sudo systemctl restart sshd
You now have a host that only accepts SSH keys. Test it out by trying
ssh nouser@BASTION_IP - it should reject you instantly.
Note your bastion's IP address, you'll need it later.
Setting up the outbound proxy
Spin up another small host somewhere, and in the same way add your SSH key to
the authorized_keys file and disable password login
Once you've done that, we can set up the firewall
sudo apt-get install ufw
sudo ufw default deny incoming
sudo ufw allow from BASTION_IP to any port 22
sudo ufw enable
Log out, you should get denied trying to SSH in from any host but your bastion.
Now log back in via your bastion (just ssh into the bastion then ssh onto the proxy host)
Let's install the proxy software!
First you'll need the IP of your proxy server, ip addr | grep inet to get this,
take the non-127 address.
sudo apt-get install dante-server
sudo nano /etc/danted.conf
you'll want to set the following in your config:
logoutput: stderr /var/log/dante.log
internal: PROXY_HOST_IP port = 1080
external: PROXY_HOST_IP
socksmethod: none
clientmethod: none


client pass {
        from: 0.0.0.0/0 to: 0.0.0.0/0
        log: connect disconnect error
}
socks pass {
        from: 0.0.0.0/0 to: 0.0.0.0/0
        log: connect disconnect error
}
and then run sudo systemctl enable danted && sudo systemctl start danted to
start it up.
Setting up pleroma
Follow the standard instructions from the documentation to install pleroma from OTP. Once you've done that and are able to access your instance, turn it off. We've got more to do.
Pleroma config
Set the relevant sections in config/prod.secret.exs to:
config :pleroma, :activitypub,
  outgoing_blocks: false

config :pleroma, :http,
  send_user_agent: true,
  user_agent: "Mozilla/5.0 (X11; Linux x86_64) AppleWebKit/537.36 (KHTML, like Gecko) Chrome/51.0.2704.103 Safari/537.36",
  proxy_url: {:socks5, {A,B,C,D}, 1080}

config :pleroma, :rate_limit,
  account_confirmation_resend: {8_640_000, 2}
Replace the A,B,C,D with the parts of your proxy host's IP - i.e {192,168,1,1}. Feel free to
swap the user-agent for whatever you want.
Nginx config
(credit to hexadix)
We also want to set up nginx to survive in the event of any high-volume attack.
Open up /etc/nginx/nginx.conf and set the following
worker_rlimit_nofile 102400;

events {
  worker_connections 100000;
}
Now open /etc/sysctl.conf and set fs.file-max = 500000, close it
and run sudo sysctl -p to reload your config
Over to /etc/security/limits.conf - add the following lines
www-data         soft    nofile          102400
www-data         hard    nofile          409600
Now reload nginx with sudo systemctl reload nginx and you should be good
Setting up cloudflare
Go sign up at https://www.cloudflare.com/ and follow their instructions to get your domain onto cloudflare. Once they're happy and your DNS is set up, we can move on. You may want to install their origin SSL certificate.
Whilst you're here, jump on over to firewall -> tools, and if you're willing
to set up on a paid plan, set some rate limit rules. Some basic ones may
include 5 requests per 10 seconds to /, block for 1 hour, or
600 requests per 1 minute to *, block for 1 hour. Set them as you feel
appropriate. I'd advise picking as low a number as you think you can get
away with.
Setting the firewall
sudo apt-get install ufw
sudo ufw default deny incoming
sudo ufw allow from BASTION_IP to any port 22
wget https://www.cloudflare.com/ips-v4
while read line; do
  sudo ufw allow from $line to any port 443
done < ips-v4
sudo ufw enable
This will only allow access to your bastion for SSH, and from cloudflare to your origin.
Adding pleroma's IP to your proxy
SSH back into your proxy and run a simple
sudo ufw allow from PLEROMA_IP to any port 1080
Now you can start up your pleroma instance, and theoretically access it as normal.
So now we've got ourselves a system by which the origin's IP is never exposed, our connection is anonymised, inbound connections are rate-limited and nobody can ssh in without first going through the bastion which only lets in our certificate.
If you want to go even further, you could install a HIDS like ossec on your hosts, or install a monitoring solution to keep track of how everything is going.